What? Why? How? Those are the questions I have heard muttered by people when I tell them that I got manageIQ talking to VRA. It is not something that is commonly done, but I am always up for a challenge so I thought I would give it a try.
The initial requirements went something like this:
- Ability manage and deploy VMWare VMs via blueprints using VRA.
- Allow users to order and delete VMs from ManageIQ.
- Would like to use Ansible Tower as part of this.
After thinking about this for a bit I sketched up a flow(ish) diagram. Forgive me, I am not an Architect, I am an automation guy :).

The basic flow of things will be a user requests a blueprint via a Catalog item in ManageIQ. The blueprint information is sent to Ansible Tower which then in turn makes an API request to VRA to trigger the blueprint deployment. Ansible Tower will then wait for a response (success/fail) from VRA, which is then returned to ManageIQ.
Before starting, I will assume you have VRA up and running along with Ansible Tower and a ManageIQ instance running. VRA should have some blueprint available and a service account with access to the blueprints. Setting up this is out of the scope of this article.
Let’s start with Ansible Tower, again you will need a service account to access the Ansible Tower API. Then you will need to setup a job template and project that points to a playbook that looks something like the following for deploying a blueprint:
---

- name:
  hosts: localhost
  connection: local
  vars:
    vra_url: https://myvra.example.com
    tenant: EXAMPLE
  tasks:
  - uri:
      url: "{{ vra_url }}/identity/api/tokens"
      method: POST
      force_basic_auth: yes
      body:
        username: "{{ username }}"
        password: "{{ password }}"
        tenant: "{{ tenant }}"
      body_format: json
      return_content: yes
      validate_certs: no
    register: vra_json
  #- debug:
  #    var: vra_json.json.id
  - name: get token
    set_fact:
      auth_token: "{{ vra_json.json.id }}"
  - name: get template info
    uri:
      url: "{{ vra_url }}/catalog-service/api/consumer/entitledCatalogItems/{{ blueprint }}/requests/template"
      headers:
        Authorization: "Bearer {{ auth_token }}"
      method: GET
      body_format: json
      return_content: yes
      validate_certs: no
    register: template_json
  - update_json:
      json_input: "{{ template_json.json | to_json }}"
      IPAddress: "{{ ipaddr }}"
    register: json_test
  - debug:
      var: json_test
  - name: kick off template
    uri:
      url: "{{ vra_url }}/catalog-service/api/consumer/entitledCatalogItems/{{ blueprint }}/requests"
      headers:
        Authorization: "Bearer {{ auth_token }}"
      body: '{{ json_test.json }}'
      method: POST
      body_format: json
      return_content: yes
      validate_certs: no
      status_code: 201
    register: request_json
  - debug:
      var: request_json.location
  - name: get template info
    uri:
      url: "{{ request_json.location }}"
      headers:
        Authorization: "Bearer {{ auth_token }}"
      method: GET
      body_format: json
      return_content: yes
      validate_certs: no
    register: job_state
    until: job_state.json.state == "SUCCESSFUL"
    retries: 20
    delay: 60
  - debug:
      var: job_state
This playbook will authenticate to VRA, obtain a token, kick off a blueprint deployment and wait until the job completes.
It takes a number of variables that will be sent to the Ansible Tower API from ManageIQ. Username and password will be passed into the job template via a tower credential object that contains the VRA service account credentials. After setting up the relevant tower job to point at the playbook created above, ensure that extra variables and or a survey is configured on launch with the variables the playbook requires.
At this point you should have some blueprints in VRA to deploy, a playbook and job template in Tower launch the VRA blueprint. The last part is to configure ManageIQ.
In order to configure ManageIQ, an Ansible Tower needs to be added as an Ansible Tower Provider. After Ansible Tower has been added and everything is visible in ManageIQ we need to set some ruby methods, create a Catalog item, then modify some of the parameters in the Catalog.
Create methods by navigating to the automation explorer. The URL will be something like https://mymanageiq.example.com/miq_ae_class/explorer#/. Find the relevant domain for creating custom methods create a VRA namespace, create a methods class within the namespace.

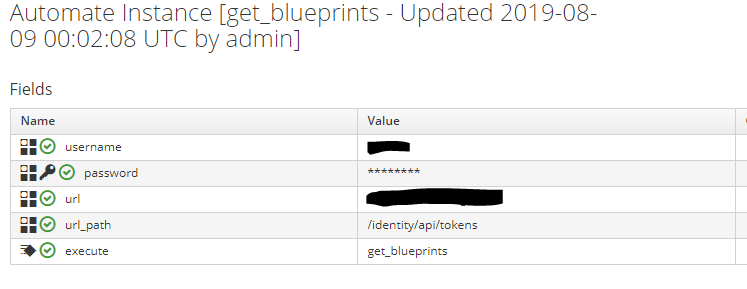
Create a instance named get_blueprints under the Methods class. The instance should have the variables vra_url, username, password, url_path and execute. The variables will be populated with your VRA information and service account details. The execute field should have get_blueprints set as the value (a method we will create next).

Next under the methods class create a new method also named get_blueprints. Create type inline and use the following code:
#
# Description: Get a list of blueprints from VRA
#
require 'rest_client'
require 'nokogiri'
require 'json'

$evm.log(:info, "Getting blueprints list from VRA")

# get auth token
def vra_auth(action, url=nil, ref=nil, body_type=:json, body=nil)
  url = "https://#{url}"+"#{ref}"

  params = {
    :method => action,
    :url => url,
    :verify_ssl => false,
    :headers => { :content_type => body_type,
                  :accept => :json },
    :payload => body
  }
  params[:payload] = body if body
    if @debug
      $evm.log(:info, "Calling VRA at: #{url}")
      $evm.log(:info, "Action: #{action}")
      $evm.log(:info, "Payload: #{params[:payload]}")
  end
  rest_response = RestClient::Request.new(params).execute

  return rest_response
end

# get blueprint list
def get_vra_blueprints(action, url=nil, ref=nil, token=nil)
  url = "https://#{url}"+"#{ref}"

  params = {
    :method => action,
    :url => url,
    :verify_ssl => false,
    :headers => { :content_type => :json,
                  :authorization => "Bearer #{token}",
                  :accept => :json }
  }

  rest_response = RestClient::Request.new(params).execute

  return rest_response
end

# set some variables

username   = $evm.object['username']
password   = $evm.object.decrypt('password')
url        = $evm.object['url']
path       = $evm.object['url_path']

body_hash = { username: username, password: password, tenant: "DHS" }
#$evm.log(:info, "#{body_hash}")
body_json = JSON.generate(body_hash)
#$evm.log(:info, "#{body_json}")
auth_json = JSON.parse(vra_auth(:post, url=url, ref=path, :json, body=body_json))
token = "#{auth_json["id"]}"
$evm.log(:info, "Getting VRA auth token")
#$evm.log(:info, "#{token}")

# get blueprint
blueprint_json = get_vra_blueprints(:get, url=url, ref="/catalog-service/api/consumer/entitledCatalogItems", token=token)
blueprint_hash = JSON.parse(blueprint_json)
#$evm.log(:info, "#{blueprint_json}")
#$evm.log(:info, "Getting blueprint list")
#$evm.log(:info, "#{blueprint_hash["content"][0]["catalogItem"]["name"]}")

# create dialog values hash
dialog_values = {}

blueprint_hash["content"].each do |item|
    #$evm.log(:info, "#{item["catalogItem"]["name"]}")
    dialog_values["#{item["catalogItem"]["id"]}"] = "#{item["catalogItem"]["name"]}"
end
#$evm.log(:info, "#{dialog_values}")

# dynamic dialog
dialog_field = $evm.object
# sort_by: value / description / none
dialog_field["sort_by"] = "value"

# sort_order: ascending / descending
dialog_field["sort_order"] = "ascending"

# data_type: string / integer
dialog_field["data_type"] = "string"
# required: true / false
dialog_field["required"] = "true"

dialog_field["values"] = dialog_values
dialog_field["default_value"] = 1

exit MIQ_OK
The ruby code will connect to VRA using the information you provided in the instance fields. It will pull out a list of blueprints and populate a dialog box with the blueprints. Next you need to create a Catalog item that can include the dialog box.
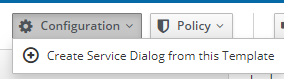
Navigate to Automation -> Ansible Tower -> Explorer. Select the Templates drop down, find the VRA job template that contains to survey/extra variables fields. Select the template and select the configuration drop down -> Create Service Dialog from this Template.
Create a catalog containing the Service Dialog created in the previous step, if you don’t know how to do this, read the doco :). Next we need to change the blueprints variable in the dialog to use the get_blueprints method. This will allow a user to select a list of blueprints pulled from the VRA API.
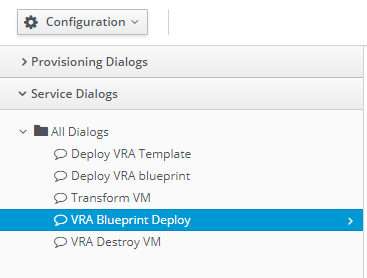
Automation -> Automate -> Customization. Find the Catalog created, and select Configuration -> Edit this dialog.
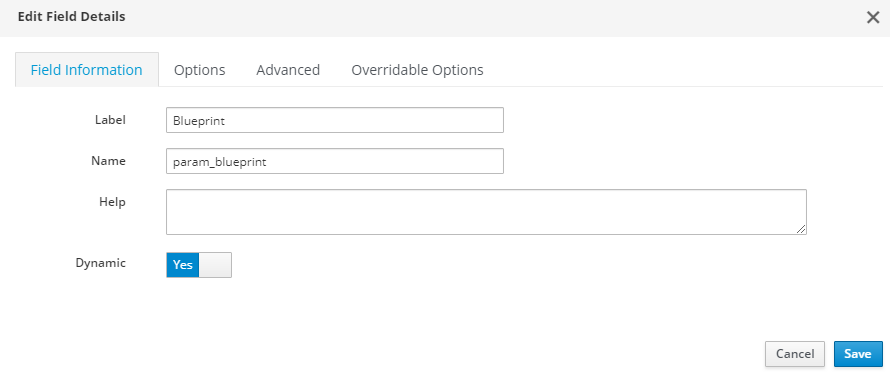
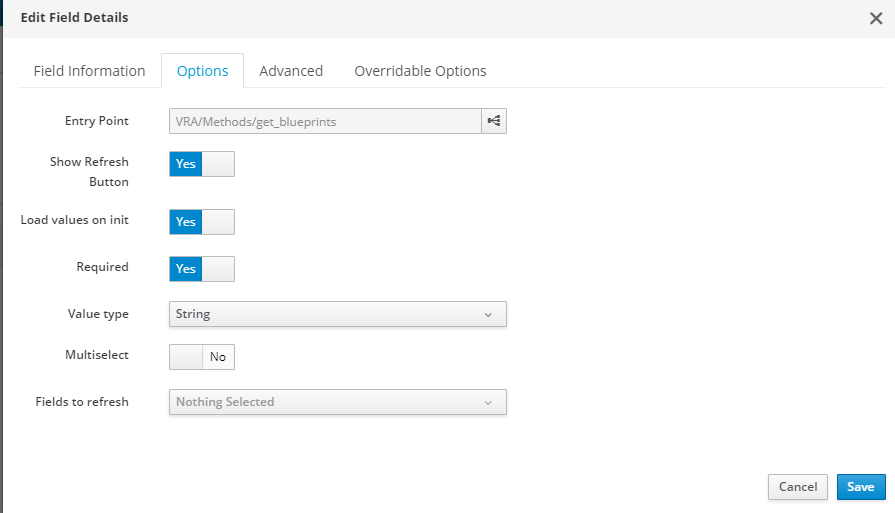
Select the blueprint object, edit (the pencil icon). Select Dynamic Yes. Select Options -> Entry Point. Find the Methods get_blueprints created earlier. Enable show refresh button, load values on init. Save the changes… All done!
In the interest of time I have skipped over a few steps, under the assumption that the reader has some prior ManageIQ/Cloudforms and Ansible experience.
Next post.. deleting a VRA deployed VM with ManageIQ.
